Traefik & DNS01 Challenge with OVH
Learn how to host containerized applications on your local server using Traefik, a powerful reverse proxy. In this guide, you will discover how to:
- Automatically generate HTTPS certificates for secure access
- Configure DNS challenges and manage your OVH domain using API keys
- Optimize the security and availability of your applications
This tutorial uses an OVH domain, but the process should be similar for other domain providers. No affiliation with OVH.
The key requirements are:
- An OVHcloud domain registration
- A fixed IP address
- A local server with Docker
- Ports 80 and 443 open to the local server
OVH Domain Name Management
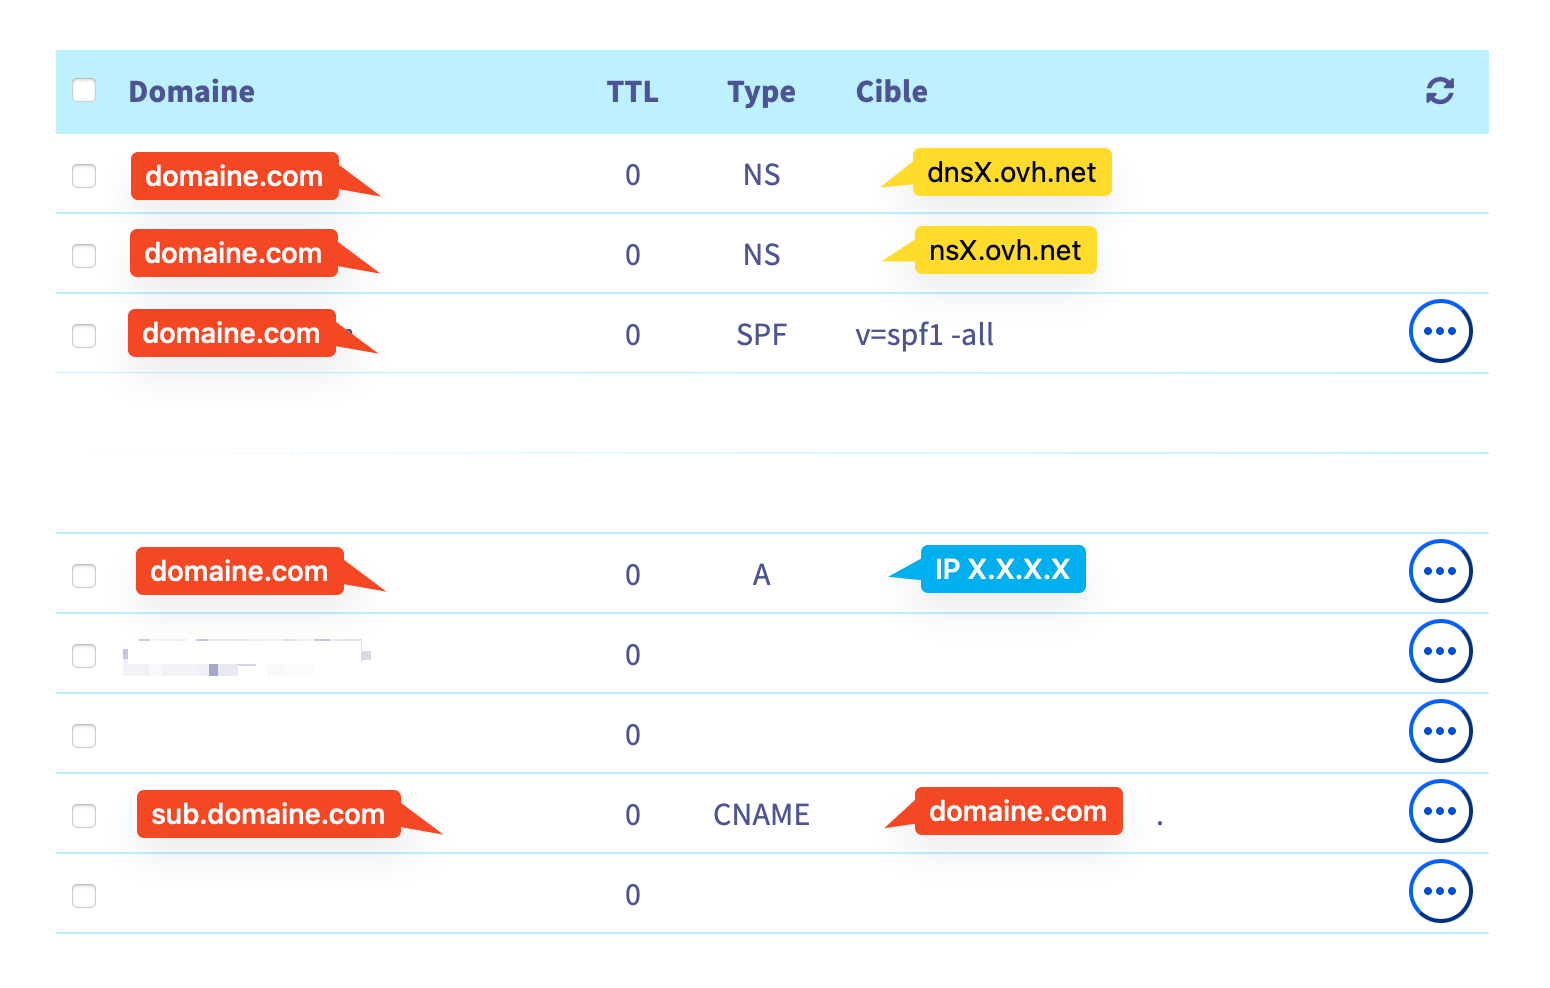
The first step is to configure the OVH domain name. Log in under your OVH account, and go to the DNS Zone section. In the example below, the domain name points to an IPv4 address (X.X.X.X), which corresponds with my router's IP address. If you have subdomain names, you can create a CNAME entry that points to the main domain.

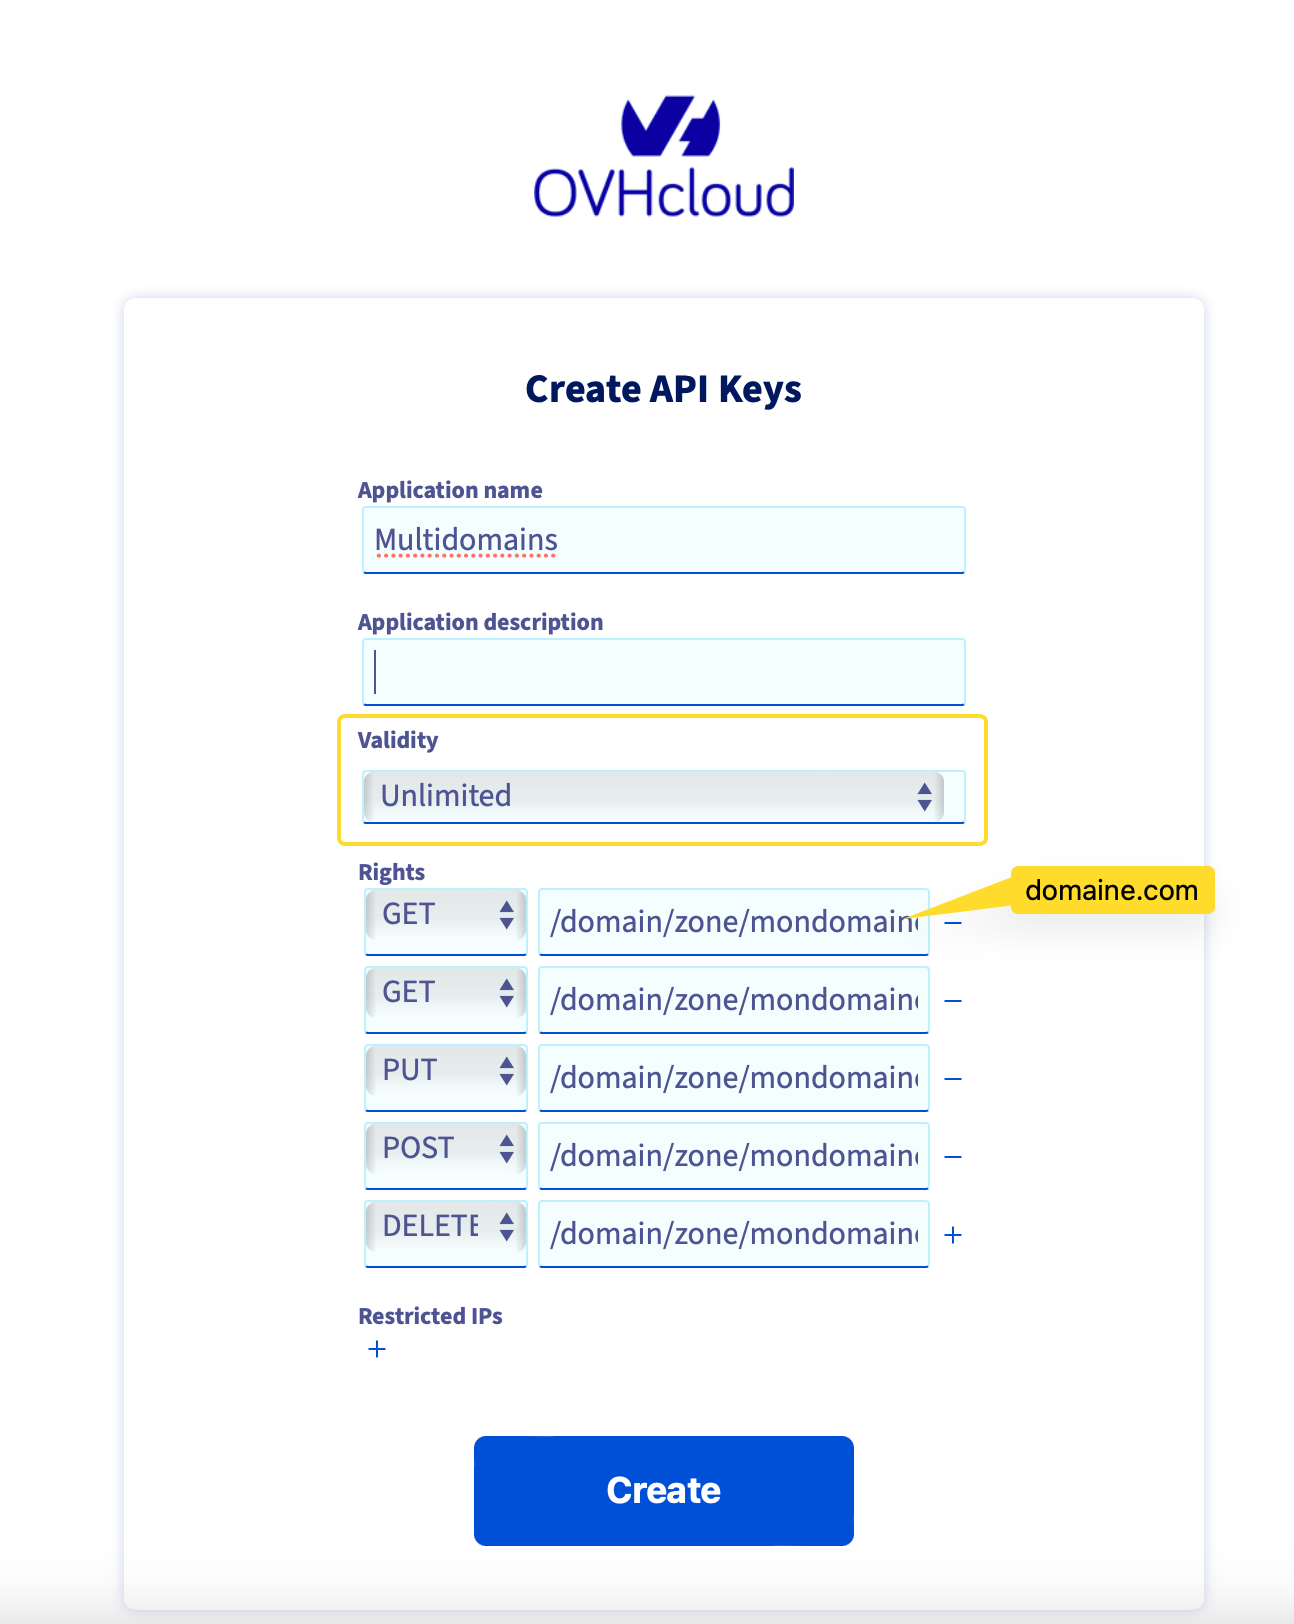
Next, you need to generate the API Keys to give access to Traefik. This information will be used to resolve the DNS challenge.
Open OVH Cloud control panel:

You should have a page similar to the one below (with fields for application name, description, validity, and rights):

Store all the credentials (Application Key, Application Secret, and Consumer Key) you've created in a secure location. We will need them later when configuring the Traefik docker-compose file.
Traefik
Create a traefik folder to store Traefik configurations, the docker-compose file and two additional folders: letsencrypt and secrets:
#Create root folder: traefik
mkdir traefik
cd traefik

#Create letsencrypt folder in the traefik folder
mkdir letsencrypt

#Create logs folder in the traefik folder for access.log & traefik log
mkdir logs

#Create secrets folder in the traefik folder
mkdir secrets
cd secrets

#Create 4 .secret files
echo ovh-eu > ovh_endpoint.secret
touch ovh_application_key.secret
touch ovh_application_secret.secret
touch ovh_consumer_key.secret
In the following files:
- ovh_application_key.secret (Application Key)
- ovh_application_secret.secret (Application Secret)
- ovh_consumer_key.secret (Consumer Key)
paste the API keys you got during the API key creation step. Next, create a docker-compose.yml file and add the configuration below:
version: "3.7"

secrets:
  ovh_endpoint:
    file: "./secrets/ovh_endpoint.secret"
  ovh_application_key:
    file: "./secrets/ovh_application_key.secret"
  ovh_application_secret:
    file: "./secrets/ovh_application_secret.secret"
  ovh_consumer_key:
    file: "./secrets/ovh_consumer_key.secret"

services:
  traefik:
    image: "traefik:latest"
    container_name: "traefik"
    restart: always
    networks:
      - default
      - domo
    ports:
      - "80:80"
      - "443:443"
      - "8080:8080"
    command:
      - "--api.insecure=true"
      - "--providers.docker=true"
      - "--providers.docker.exposedbydefault=false"
      - "--entrypoints.web.address=:80"
      #Port redirection 80 -> 443
      - "--entrypoints.web.http.redirections.entrypoint.to=websecure"
      - "--entrypoints.web.http.redirections.entrypoint.scheme=https"
      - "--entrypoints.websecure.address=:443"
      - "--entrypoints.websecure.http.tls=true"
      - "--entrypoints.websecure.http.tls.certResolver=myresolver"
      #Main domain
      - "--entrypoints.websecure.http.tls.domains[0].main=domaine.com"
      #Sub-domains (optionnal)
      - "--entrypoints.websecure.http.tls.domains[0].sans=*.domaine.com"
      #your email
      - "--certificatesresolvers.myresolver.acme.email=toto@toto.com"
      - "--certificatesresolvers.myresolver.acme.storage=/letsencrypt/acme.json"

      - "--certificatesresolvers.myresolver.acme.dnschallenge=true"
      #Provider OVH
      - "--certificatesresolvers.myresolver.acme.dnschallenge.provider=ovh"
      - "--certificatesresolvers.myresolver.acme.dnschallenge.delaybeforecheck=10"
      - "--certificatesresolvers.myresolver.acme.dnschallenge.disablepropagationcheck=true"
      #DNS Zones
      - "--certificatesresolvers.myresolver.acme.dnschallenge.resolvers=dnsXXX.ovh.net,nsXXX.ovh.net"

      - "--accesslog=true"
      - "--accesslog.filepath=/logs/access.log"
    secrets:
      - "ovh_endpoint"
      - "ovh_application_key"
      - "ovh_application_secret"
      - "ovh_consumer_key"

    environment:
      - "OVH_ENDPOINT_FILE=/run/secrets/ovh_endpoint"
      - "OVH_APPLICATION_KEY_FILE=/run/secrets/ovh_application_key"
      - "OVH_APPLICATION_SECRET_FILE=/run/secrets/ovh_application_secret"
      - "OVH_CONSUMER_KEY_FILE=/run/secrets/ovh_consumer_key"

    labels:
      - "traefik.http.routers.api.service=api@internal"
      - "traefik.http.routers.api.entrypoints=websecure,web"

    volumes:
      - "./logs/:/logs/"
      - "./letsencrypt:/letsencrypt"
      - "/var/run/docker.sock:/var/run/docker.sock:ro"

networks:
  default:
  #Bridge Network : Domotique
  domo:
    external: true
Here are some explanations about the docker-compose configuration:
- secrets: these four files are used for OVH API calls to perform the DNS challenge. DNS-01 Challenge
- dnschallenge.resolvers: configure the DNS zones defined in the OVH NS field

- domo: name of a bridge network where docker containers are located. Identify the external bridge networks you want to grant Traefik access to.
Start Traefik
The final step is to start the Docker container and check that everything is working correctly.
Please let me know in the comments if it is correctly working for you.
docker compose up -d
#Check the logs:
docker compose logs -f
Thank you for reading!

Member discussion